06 Dec 2018
|
Spring
Java
[2026년 추가] 이 글에서 쓴 com.amazonaws:aws-java-sdk(AWS SDK for Java v1)는 2024년 7월 31일부로 유지보수 모드로 전환됐고, 2025년 12월 31일부로 공식 지원이 종료됐다 (기존 앱이 당장 멈추진 않지만, 신규 기능/보안 패치를 더 받지 못한다). 새로 프로젝트를 시작한다면 software.amazon.awssdk:s3(SDK v2)를 쓰는 게 맞다. v2에서는 패키지가 software.amazon.awssdk.*로 바뀌고, AmazonS3ClientBuilder 대신 S3Client.builder()...build() 형태로 빌더 API 이름도 조금씩 달라졌다 — 흐름 자체(자격증명 → 리전 → 클라이언트 빌드)는 아래 예제와 동일하니 마이그레이션 가이드를 참고하면 어렵지 않다.
amazon s3 인증 받기 및 설정 관련 내용은 생략하였다.
프로젝트 구성을 위해 의존성을 추가.
....
<dependency>
	<groupId>com.amazonaws</groupId>
	<artifactId>aws-java-sdk</artifactId>
	<version>1.11.313</version>
</dependency>
....
spring
 aws:
  access-key: 발급받은 accessKey
  secret-key: 발급받은 secretKey
  region: 지역
  bucket: s3 버킷이름
  url: S3 url
- AWS properties Configuration 추가.
@Configuration
@ConfigurationProperties(prefix="spring.aws")
public static class AwsProperties{
	private String accessKey;
	private String secretKey;
	private String region;
	private String bucket;
	private String url;

	//<editor-fold desc="getter setter">
	public void setAccessKey(String accessKey){
		this.accessKey=accessKey;
	}

	public void setSecretKey(String secretKey){
		this.secretKey=secretKey;
	}

	public void setRegion(String region){
		this.region=region;
	}

	public String getBucket(){
		return bucket;
	}

	public void setBucket(String bucket){
		this.bucket=bucket;
	}

	public String getUrl(){
		return url;
	}

	public void setUrl(String url){
		this.url=url;
	}
}
- AmazonS3Client 빈 등록
import com.amazonaws.auth.AWSStaticCredentialsProvider;
import com.amazonaws.auth.BasicAWSCredentials;
import com.amazonaws.regions.Regions;
import com.amazonaws.services.s3.AmazonS3;
import com.amazonaws.services.s3.AmazonS3ClientBuilder;
.....
@Bean
public AmazonS3 amazonS3Client(AwsProperties awsProperties){
	return AmazonS3ClientBuilder.standard().withCredentials(new AWSStaticCredentialsProvider(new BasicAWSCredentials(awsProperties.accessKey, awsProperties.secretKey))).withRegion(Regions.fromName(awsProperties.region)).build();
}
...
- Controller에서 이미지 업로드 호출 부분.
@Controller
public class UploadController {

	@Autowired
	private UploadService uploadService
	....
	@PostMapping("/uploadImage")
	public void background(
			@RequestParam("userImage") MultipartFile multipartFile
	){
		String uploadUrl = "업로드 url 정보";
		uploadService.updateBackgroundImage(uploadUrl, multipartFile);
	}
	....

}
- Service 에서 AmazonS3 에 이미지 업로드 하는 부분.
@Service
public class UploadService {

	@Autowired
	private AmazonS3 amazonS3;

	@Autowired
	private AwsProperties awsProperties;

	....
	// controller 에서 실행한 부분.
	public void updateBackgroundImage(String url, MultipartFile multipartFile){
        upload(url, multipartFile);
    }

	private void upload(String url, MultipartFile file){
        try{
            String uploadFileName = file.getOriginalFilename();
            String fileExtension = uploadFileName.substring(uploadFileName.lastIndexOf(".") + 1, uploadFileName.length());

            String contentTypeTail = "jpeg";
            if (fileExtension.toLowerCase().equals("gif")) contentTypeTail = "gif";
            else if (fileExtension.toLowerCase().equals("png")) contentTypeTail = "png";

            byte[] bytes = file.getBytes();
            upload(url, new ByteArrayInputStream(bytes), contentTypeTail);
        }catch(Throwable t){
            throw new JmlimException(t.getMessage(), HttpStatus.BAD_REQUEST, t);
        }
    }

	private void upload(String key, InputStream inputStream, String imageType){
        ObjectMetadata metadata = new ObjectMetadata();
        if(imageType != null) {
            metadata.addUserMetadata("Content-Type", "image/"+imageType);
        }

        PutObjectRequest putObjectRequest = new PutObjectRequest(awsProperties.getBucket(), key, inputStream, metadata);
		// 퍼블릭으로 공개하여 올림.
        putObjectRequest.setCannedAcl(CannedAccessControlList.PublicRead);
        amazonS3.putObject(putObjectRequest);
    }
}
30 Nov 2018
|
Spring
Java
Redis
WAS의 세션을 이용했을 때, 서버가 한 대일 때에는 WAS의 세션을 사용하는데에 문제가 없었을 것이다.
사용자가 증가함에 따라 서버에 과부하가 걸려 WAS를 증설하기 시작할 경우 HttpSession을 사용하면 세션이 두군데서 관리된다.
ex) 로그인 요청은 1번 서버로 들어와 1번 서버의 세션에 담았는데, 그 다음 요청을 2번에 하게 된다면?? 로그인 상태가 아니다.
그렇기 때문에 단일 서버 환경에서 세션 기능을 사용하기 위해서는 HttpSession 객체를 활용해도 상관없지만,
멀티 서버 환경에서 세션 기능을 사용하기 위해서는 세션 정보를 Redis와 같은 DB에 저장해야 한다.
리눅스에 Redis 설치하기.
먼저 리눅스에 redis를 설치하기 위해서 파일을 직접 다운받거나 apt-get 등을 이용할 수 있다.
만약 apt-get 패키지 다운로드를 사용할 경우 아래와 같이 커맨드를 입력하면 된다.
$ sudo apt-get install redis-server
redis 동작하기
–
Spring Boot에서 Spring session + redis 로 세션 관리 하기.
의존성 추가.
<dependency>
    <groupId>org.springframework.boot</groupId>
    <artifactId>spring-boot-starter-data-redis</artifactId>
</dependency>
<dependency>
    <groupId>org.springframework.session</groupId>
    <artifactId>spring-session</artifactId>
</dependency>
application.yml 추가.
spring:
  redis:
    host: 192.168.0.156 # 레디스가 설치되어있는 서버의 아이피
    port: 6379
Spring Session Configuration 추가.
import org.springframework.context.annotation.Configuration;
import org.springframework.session.data.redis.config.annotation.web.http.EnableRedisHttpSession;
import org.springframework.session.web.context.AbstractHttpSessionApplicationInitializer;

@Configuration
@EnableRedisHttpSession
public class RedisSessionConfig extends AbstractHttpSessionApplicationInitializer {
}
[2026년 추가] 지금 기준으로 이 글을 그대로 따라 하면 두 군데서 막힌다.
spring-session 아티팩트는 지금은 범용 코어일 뿐이고, Redis 연동에는 spring-session-data-redis(groupId: org.springframework.session)를 받아야 한다.- Spring Boot 3.0부터 Redis 설정 프리픽스가
spring.redis.* 에서 spring.data.redis.* 로 바뀌었다. (공식 문서 확인) 그대로 spring.redis.host를 쓰면 무시되고 기본값(localhost:6379)으로 접속을 시도하게 된다.
spring:
  data:
 redis:
   host: 192.168.0.156
   port: 6379
참고로 최신 Spring Boot에서는 spring-session-data-redis 의존성만 추가하면 @EnableRedisHttpSession 없이도 자동 설정(auto-configuration)되는 경우가 많다 — 커스터마이징이 필요할 때만 명시적으로 @EnableRedisHttpSession을 쓰면 된다.
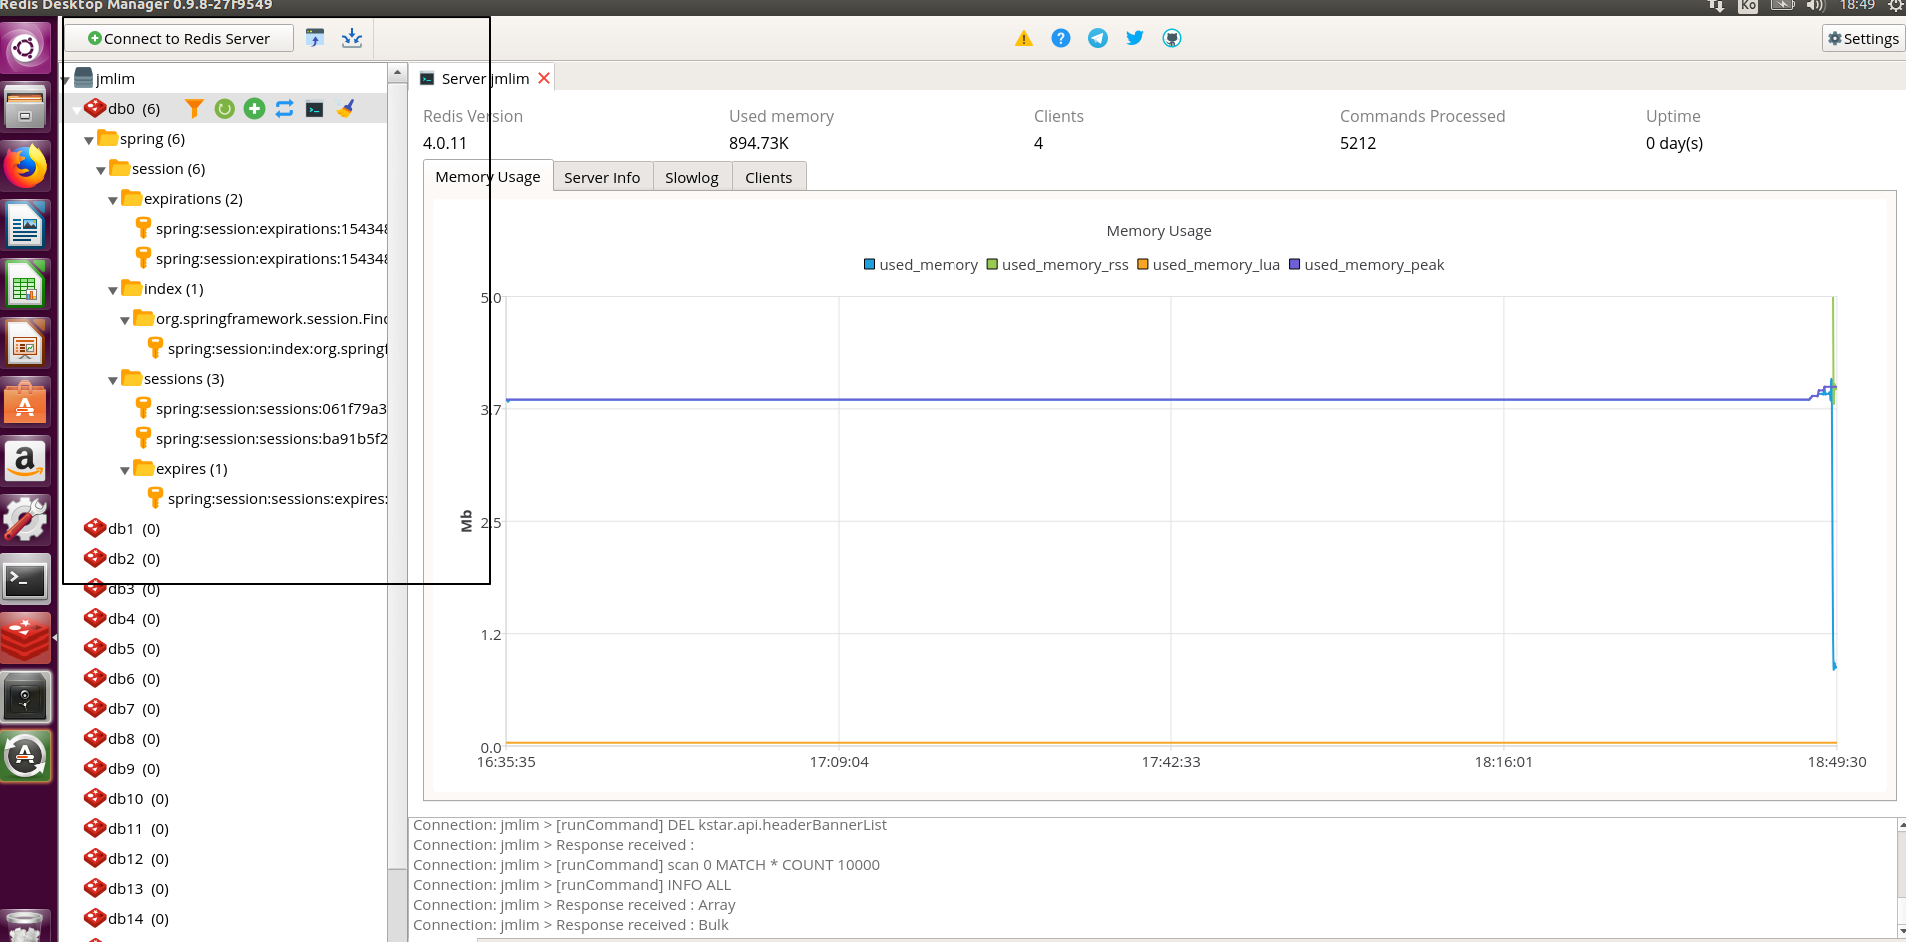
레디스에서 세션 저장여부 확인.
참고:
- http://wiki.sys4u.co.kr/pages/viewpage.action?pageId=8552454
- https://webisfree.com/2018-01-25/%EB%A6%AC%EB%88%85%EC%8A%A4%EC%97%90-redis-%EB%8D%B0%EC%9D%B4%ED%84%B0%EB%B2%A0%EC%9D%B4%EC%8A%A4-%EC%84%A4%EC%B9%98%ED%95%98%EA%B8%B0-install
28 Nov 2018
|
Spring
Java
기존 Spring + java web application 다국어 지원 설정을 하기 위해선 여러가지 사항들을 고려 해야 한다.
spring framework 및 설정을 통해서 다국어를 사용하는 방법에 여러가지가 있다.
하지만 Spring Boot의 가장 큰 장점은 대부분의 설정이 이미 되어있어서 별로로 설정하지 않아도 사용 가능하다.
MessageSource 설정도 역시 이미 되어있다.
추기로 이 블로그에선 yml 파일을 사용하여 다국어를 설정해 보는 방법을 작성하였다.
다국어 관련 Config 파일 작성.
yml YamlResourceBundle 클래스를 사용하기 위한 pom.xml 파일 디펜던시 추가.
<!-- https://mvnrepository.com/artifact/net.rakugakibox.util/yaml-resource-bundle -->
<dependency>
  <groupId>net.rakugakibox.util</groupId>
  <artifactId>yaml-resource-bundle</artifactId>
  <version>1.1</version>
</dependency>
Configuration 작성.
package 파일이 들어갈 패키지명;

import net.rakugakibox.util.YamlResourceBundle;
import org.springframework.beans.factory.annotation.Value;
import org.springframework.context.MessageSource;
import org.springframework.context.annotation.Bean;
import org.springframework.context.annotation.Configuration;
import org.springframework.context.support.ResourceBundleMessageSource;
import org.springframework.web.servlet.LocaleResolver;
import org.springframework.web.servlet.config.annotation.InterceptorRegistry;
import org.springframework.web.servlet.config.annotation.WebMvcConfigurer;
import org.springframework.web.servlet.i18n.LocaleChangeInterceptor;
import org.springframework.web.servlet.i18n.SessionLocaleResolver;
import java.util.Locale;
import java.util.MissingResourceException;
import java.util.ResourceBundle;

// (2026년 수정) WebMvcConfigurerAdapter는 Spring 5부터 deprecated, Spring 6에서 삭제됨.
// 자바 8의 인터페이스 default method 덕분에 어댑터 클래스 없이 WebMvcConfigurer를 바로 구현하면 된다.
@Configuration
public class MessageSourceConfig implements WebMvcConfigurer {

     @Bean
    public LocaleResolver localeResolver() {
        SessionLocaleResolver slr = new SessionLocaleResolver();
        slr.setDefaultLocale(Locale.KOREA);
        return slr;
    }

    @Bean
    public LocaleChangeInterceptor localeChangeInterceptor() {
        LocaleChangeInterceptor lci = new LocaleChangeInterceptor();
        lci.setParamName("lang");
        return lci;
    }

    @Override
    public void addInterceptors(InterceptorRegistry registry) {
        registry.addInterceptor(localeChangeInterceptor());
    }

    @Bean("messageSource")
    public MessageSource messageSource(
            @Value("${spring.messages.basename}") String basename,
            @Value("${spring.messages.encoding}") String encoding
    ) {
        YamlMessageSource ms = new YamlMessageSource();
        ms.setBasename(basename);
        ms.setDefaultEncoding(encoding);
        ms.setAlwaysUseMessageFormat(true);
        ms.setUseCodeAsDefaultMessage(true);
        ms.setFallbackToSystemLocale(true);
        return ms;
    }
}

class YamlMessageSource extends ResourceBundleMessageSource {
    @Override
    protected ResourceBundle doGetBundle(String basename, Locale locale) throws MissingResourceException {
        return ResourceBundle.getBundle(basename, locale, YamlResourceBundle.Control.INSTANCE);
    }
}
src/main/resources/appilcation.yml 에 다국어 설정파일이 있는 경로 추가.
spring:
 .....
  messages:
    basename: i18n/messages
    encoding: UTF-8
src/main/resources/i18n/messages.yml 파일
alert:
 confirm: "확인"
 cancel: "취소"
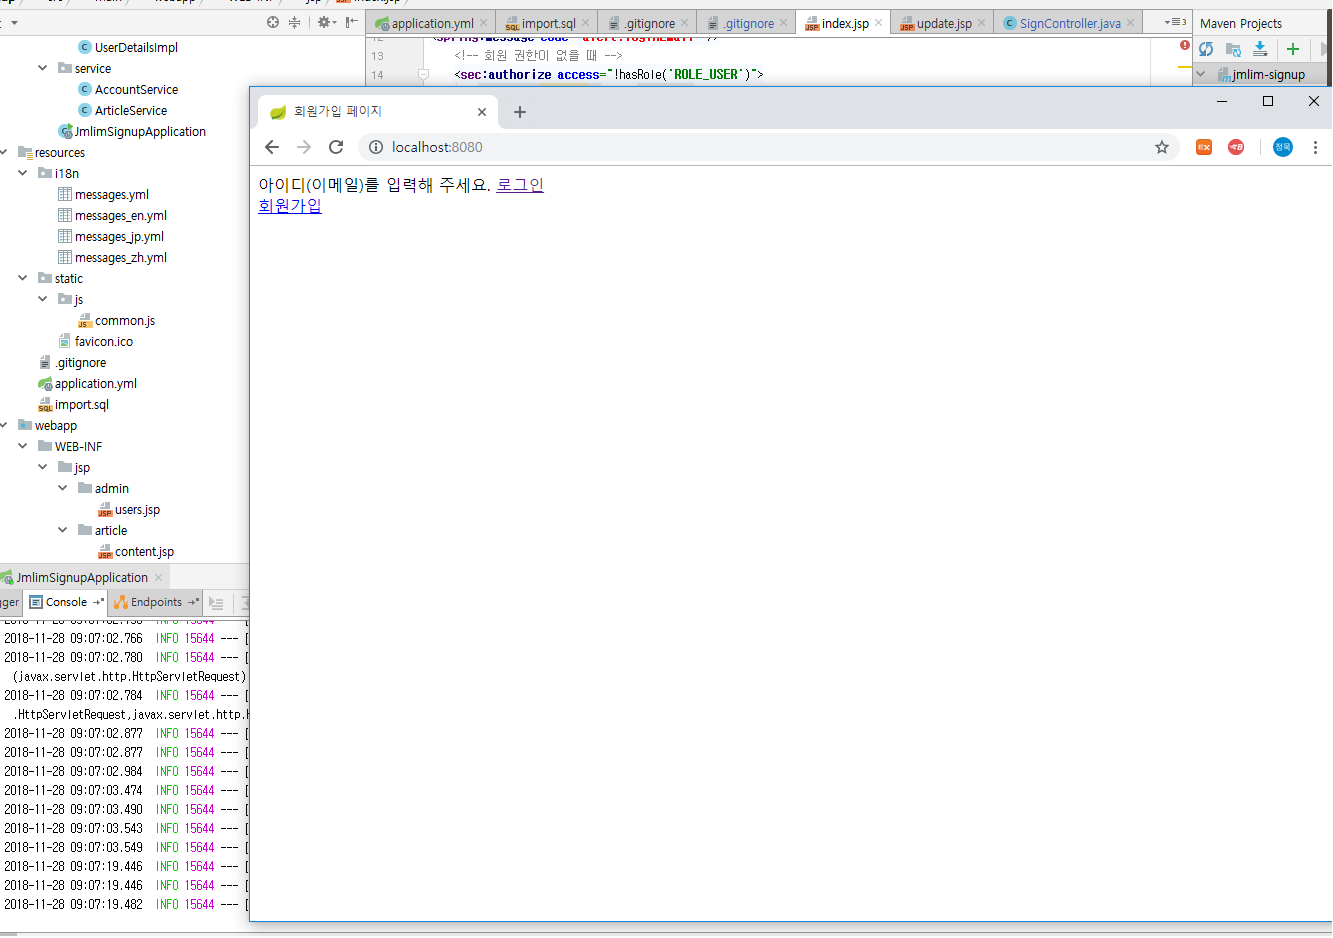
 loginEmail: "아이디(이메일)를 입력해 주세요."
 loginPassword: "비밀번호를 입력해 주세요."
 loginFail: "아아디(이메일) 또는 비밀번호가 올바르지 않습니다."
src/main/resources/i18n/messages_en.yml 파일
alert:
 confirm: "Ok"
 cancel: "Cancel"
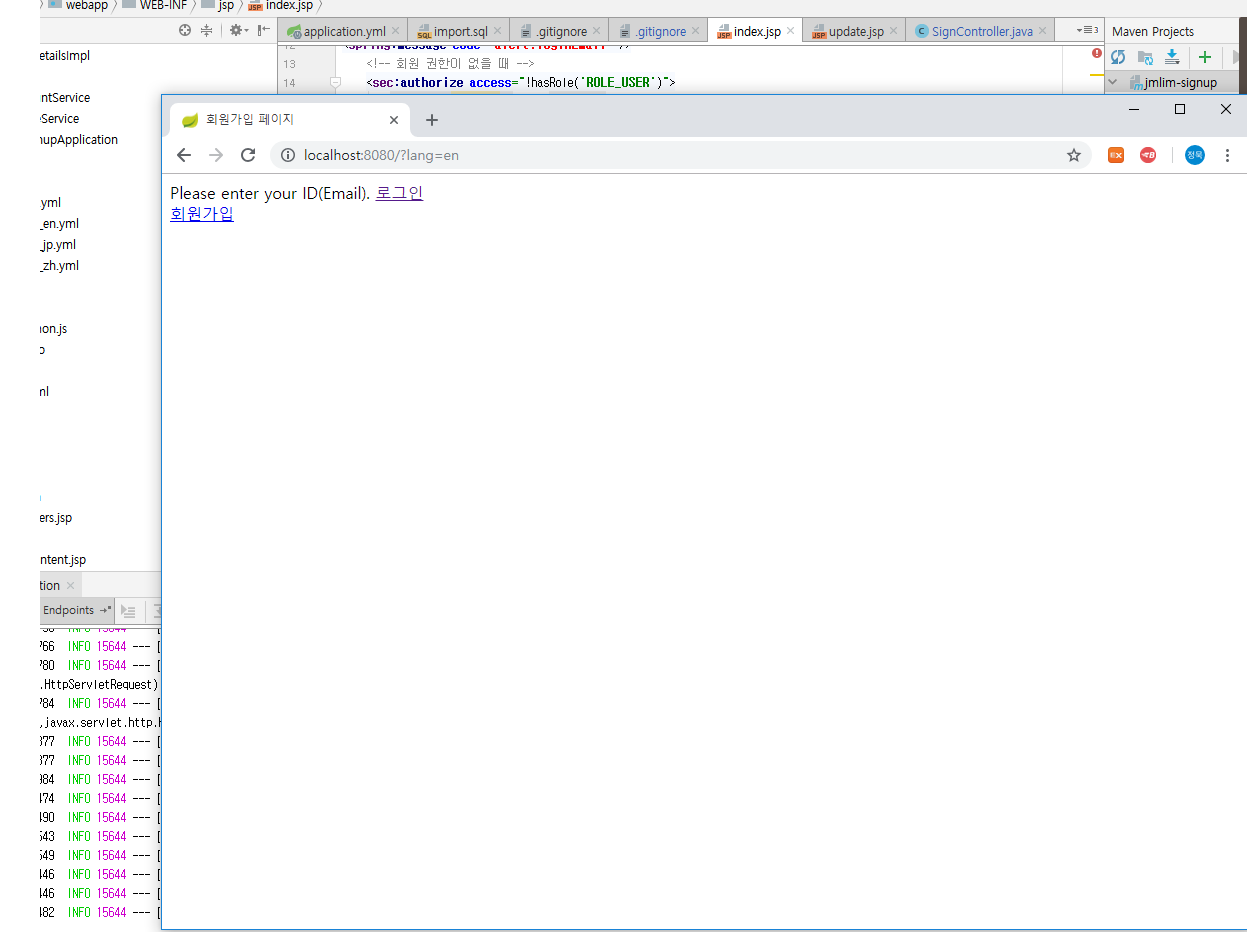
 loginEmail: "Please enter your ID(Email)."
 loginPassword: "Please enter a password."
 loginFail: "The email or password is invalid."
src/main/resources/i18n/messages_jp.yml 파일
alert:
 confirm: "確認"
 cancel: "取り消し"
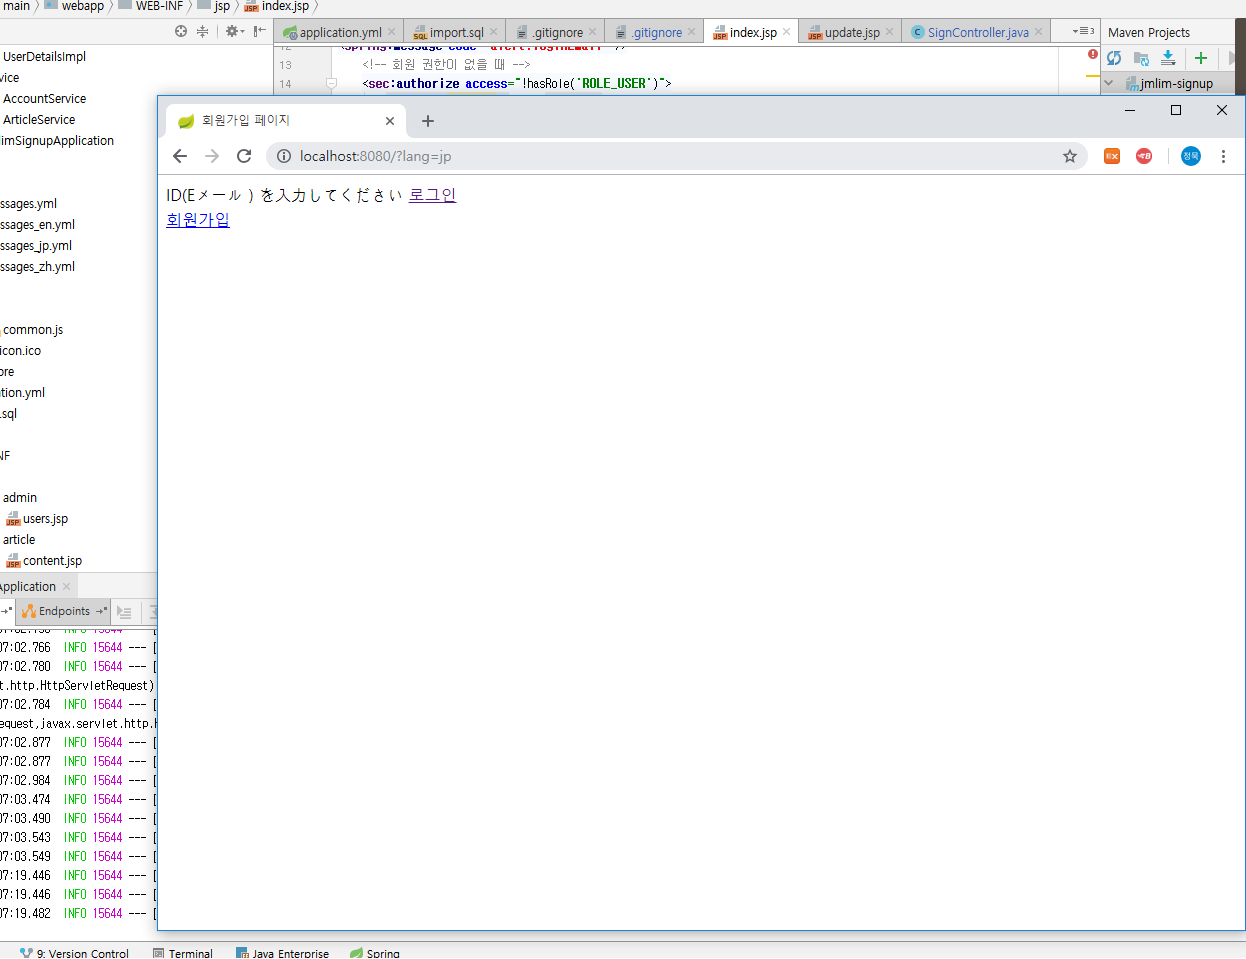
 loginEmail: "ID(Eメール)を入力してください"
 loginPassword: "パスワードを入力してください"
 loginFail: "ID(Eメール)またはパスワードをもう一度ご確認ください。"
src/main/resources/i18n/messages_zh.yml 파일.
alert:
 confirm: "确认"
 cancel: "取消"
 loginEmail: "请输入用户名(邮箱)。"
 loginPassword: "请输入密码。"
 loginFail: "请重新确认用户名(邮箱)或者密码。"
jsp 페이지에서 사용하기
<%@ taglib prefix="spring" uri="http://www.springframework.org/tags"%> <-- 이와같이 태그 선언 후

<spring:message code="alert.loginEmail" /> 원하는 텍스트가 쓰여진 메세지 코드값 정의
thymeleaf 페이지에서 사용하기.
  ...
  <div>
    <span th:text="#{alert.loginEmail}">아이디(이메일)를 입력해 주세요.</span>
  </div>
  ...
default url 조회
영문조회 시 (lang=en)
일문 조회시 (lang=jp)